背景:Nginx 的 HTTP Basic 认证与WebDav 的APT或官方源中,默认静态编译是不包含 nginx-dav-ext-module ,除了自行做源码编译外,还可以动态模块安装,达到完整WebDav支持目的。
注意:Nginx的动态/静态模块,一定要与Nginx主程序版本匹配,否则可能会导致Nginx无法启动。
安装 libnginx-mod-http-dav-ext
APT 源安装
缺点:Nginx版本,是跟随Ubuntu版本的,比如:24.04是1.24
优点:Ubuntu官方维护
方法一:安装 nginx-full 包(Ubuntu – Details of package nginx-full in noble),具体包含:
- libnginx-mod-http-auth-pam: 允许 Nginx 通过 PAM (可插拔认证模块) 进行用户认证。
- libnginx-mod-http-dav-ext: 为 Nginx 的 WebDAV 功能添加缺失的命令支持。
- libnginx-mod-http-echo: 提供类似 Shell 的 echo 等便捷指令,用于调试和脚本编写。
- libnginx-mod-http-geoip2: 基于 MaxMind GeoIP2 数据库,为 HTTP 请求提供地理位置信息。
- libnginx-mod-http-subs-filter: 一个替换过滤器,可以在 Nginx 的响应中执行文本替换。
- libnginx-mod-http-upstream-fair: 一个公平的负载均衡模块,用于优化上游服务器的请求分配。
- ibnginx-mod-stream-geoip2: 与 HTTP 模块类似,但为 TCP/UDP 流(Stream)模块提供 GeoIP2 支持。
- nginx: 核心的 Nginx 软件包,版本要求为 大于等于 1.24.0-2ubuntu7.13 且 小于 1.24.0-2ubuntu7.13.1~。
ubuntu 还维度了几个包:
- nginx: 标准的、功能最基础的 Nginx 版本。
- nginx-extras: 提供了比 nginx-full 更多的额外模块。
- nginx-light: 一个轻量级版本,包含的模块最少。
- nginx-common: 包含 Nginx 的通用配置文件等。
- nginx-doc: Nginx 的文档。
- nginx-dev: Nginx 的开发文件。
方法二:安装独立动态模块包 libnginx-mod-http-dav-ext
sudo apt update
sudo apt install libnginx-mod-http-dav-ext
DaryL 仓库源安装
优点:可以选择与Nginx主程序版本匹配的安装文件。
方式一:APT添加源
#sudo apt install curl gnupg
#sudo mkdir -p /etc/apt/keyrings/

# stable 是稳定版
sudo bash -c 'curl -fsSL https://packagecloud.io/DaryL/libnginx-mod-http-dav-ext-stable/gpgkey | gpg --dearmor > /etc/apt/keyrings/DaryL_libnginx-mod-http-dav-ext-stable-archive-keyring.gpg'
# noble 是 Ubuntu 24.04 的代号
sudo tee /etc/apt/sources.list.d/DaryL_libnginx-mod-http-dav-ext-stable.list > /dev/null <<EOF
deb [signed-by=/etc/apt/keyrings/DaryL_libnginx-mod-http-dav-ext-stable-archive-keyring.gpg] https://packagecloud.io/DaryL/libnginx-mod-http-dav-ext-stable/ubuntu noble main
EOF
# 优先使用DaryL源,而非发行版提供的软件包
echo -e "Package: *\nPin: origin packagecloud.io\nPin: release o=libnginx-mod-http-dav-ext\nPin-Priority: 900\n" | sudo tee /etc/apt/preferences.d/99libnginx-mod-http-dav-ext

sudo apt update
sudo apt install libnginx-mod-http-dav-ext
方式二:手工下载deb包
在 DaryL/libnginx-mod-http-dav-ext-stable 使用搜索功能,选择适合你系统的包。
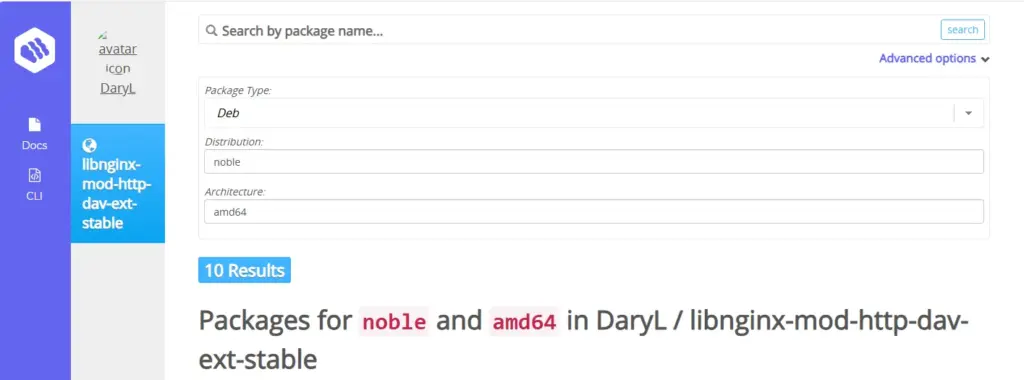
包名格式通常为 libnginx-mod-http-dav-ext_<版本号>~<系统代号>_<架构>.deb,比如:Ubuntu 24.04 x64 需要寻找文件名中包含 ~noble 和 _amd64
sudo apt install ./libnginx-mod-http-dav-ext_3.0.0+nginx-1.30.3-1~noble_amd64.deb
sudo apt install -f # 自动补齐缺失依赖、卸载冲突包、修复安装中断留下的坏依赖。
配置使用 dev_ext
先删除默认配置,不然在 sudo systemctl restart nginx && sudo systemctl status nginx 报错。
$ sudo cat  /etc/nginx/conf.d/dav-ext.conf

dav_ext_methods PROPFIND OPTIONS;
$ sudo rm /etc/nginx/conf.d/dav-ext.conf
安装后,在 nginx -V 的 --modules-path=/usr/lib/nginx/modules 目录里,有了 ngx_http_dav_ext_module.so 文件。
但在 nginx -V 不会显示 dav_ext,因为这里只显示的查看静态编译参数,不包含动态模块。
nginx.conf
在 events 前面,添加一行:
load_module /usr/lib/nginx/modules/ngx_http_dav_ext_module.so;其他配置与 [[PC/Posted to Blog/Nginx 的 HTTP Basic 认证与WebDav|Nginx 的 HTTP Basic 认证与WebDav]] 一样,如下:
http 区域
    # 定义锁定区域的名称、大小、超时时间
    dav_ext_lock_zone zone=davLockSpace:1m timeout=1m;
server/location 区域
    autoindex on;
    # HTTP Basic 认证
    auth_basic "Restricted WebDAV";
    auth_basic_user_file /etc/nginx/conf.d/xxx.htpasswd;  # 密码文件路径

    # WebDAV 方法配置
    dav_methods PUT DELETE MKCOL COPY MOVE;
    dav_ext_methods PROPFIND OPTIONS LOCK UNLOCK;
    dav_ext_lock zone=davLockSpace;     # 要使用在 http 中定义的名称
    create_full_put_path on;            # 允许 PUT 时自动创建目录
    dav_access user:rw group:rw all:r;
    client_max_body_size 15M;           # 限制上传文件大小(按需调整)
在开启完整的WebDav支持后,正常来说不需要 autoindex on; 但在使用浏览器、curl测试访问时(因为请求方法是get /),如果没有这一行,且也没有index.html,会报403错误,且在的 error.log 记录为
2026/07/12 13:11:59 [error] 2457#2457: *18 directory index of "/data/www/webDav/" is forbidden, client: 183.194.145.144, server: t725.cn, request: "GET /dav/ HTTP/2.0", host: "t725.cn"服务端验证
$ sudo nginx -t
nginx: the configuration file /etc/nginx/nginx.conf syntax is ok
nginx: configuration file /etc/nginx/nginx.conf test is successful
$ sudo nginx -T 2>&1 | grep -i dav_ext  # 看到以下4行,代表是成功的。
load_module /usr/lib/nginx/modules/ngx_http_dav_ext_module.so;
    dav_ext_lock_zone zone=davLockSpace:1m timeout=1m;
    dav_ext_methods PROPFIND OPTIONS LOCK UNLOCK;
    dav_ext_lock zone=davLockSpace;

$ sudo systemctl restart nginx && sudo systemctl status nginx

# 查看静态编译参数,这里不会显示 dav_ext,因为是动态模块。
$ sudo nginx -V 2>&1 | grep 'configure arguments' | sed 's/ --/\n  --/g'
客户端验证
curl --ca-native -u uxxx:pxxx -I https://t725.cn/abc/
curl --ca-native -u uxxx:pxxx -X OPTIONS -I https://t725.cn/abc/
curl --ca-native -u uxxx:pxxx -X PROPFIND -I https://t725.cn/abc/
推荐启用 WebDAV 的文件锁功能
锁功能目的是客户端可通过 LOCK/UNLOCK 方法防止多人同时修改文件,如果不开启:
- 对 Windows 资源管理器、macOS Finder 等:有显著负面影响。这些客户端在挂载 WebDAV 为网络驱动器时,通常依赖
LOCK/UNLOCK来实现读写支持。移除后,可能导致映射驱动器失败、频繁弹出认证框、文件列表刷新异常或无法写入。 - 对 Nextcloud、OwnCloud 等:影响较小或可控。这类现代应用有自己应用层的并发控制机制,较少依赖 WebDAV 的
LOCK。移除锁功能,应用自身的机制依然能保证数据一致性。 - 对专用 WebDAV 客户端(如 RaiDrive):可能有影响。这类工具为获得最佳兼容性常会使用 WebDAV 标准功能。移除
LOCK/UNLOCK可能导致其功能降级或不稳定。 - 对自定义脚本或程序:完全取决于你的实现。如果你的脚本使用了
LOCK/UNLOCK来保证操作原子性,移除后需要自己实现并发控制,否则有数据损坏风险。
发表回复
要发表评论,您必须先登录。